Google Maps を使う
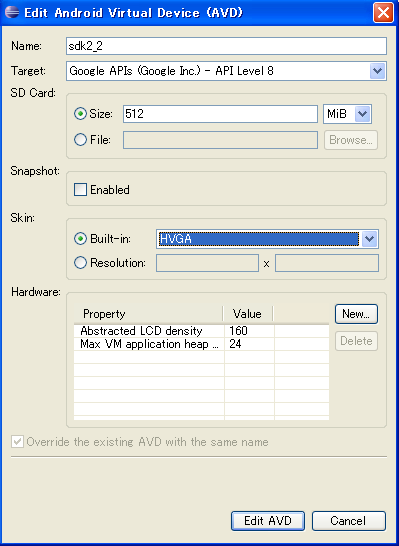
準備:Google APIs の追加
Android の SDK Manager を起動し,以下の画面において Google APIs を追加する(全ての API レベルについて追加すると,インストールに時間がかかる.特定のバージョンのみに絞った方がよい)
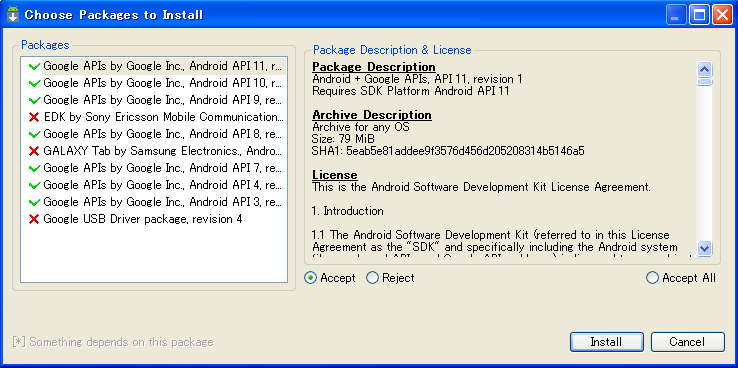
実行ログは以下のとおり:
Downloading Google APIs by Google Inc., Android API 11, revision 1
Installing Google APIs by Google Inc., Android API 11, revision 1
Installed Google APIs by Google Inc., Android API 11, revision 1
Downloading Google APIs by Google Inc., Android API 10, revision 1
Installing Google APIs by Google Inc., Android API 10, revision 1
Installed Google APIs by Google Inc., Android API 10, revision 1
Downloading Google APIs by Google Inc., Android API 9, revision 2
Installing Google APIs by Google Inc., Android API 9, revision 2
Installed Google APIs by Google Inc., Android API 9, revision 2
Downloading Google APIs by Google Inc., Android API 8, revision 2
Installing Google APIs by Google Inc., Android API 8, revision 2
Installed Google APIs by Google Inc., Android API 8, revision 2
Downloading Google APIs by Google Inc., Android API 7, revision 1
Installing Google APIs by Google Inc., Android API 7, revision 1
Installed Google APIs by Google Inc., Android API 7, revision 1
Downloading Google APIs by Google Inc., Android API 4, revision 2
Installing Google APIs by Google Inc., Android API 4, revision 2
Installed Google APIs by Google Inc., Android API 4, revision 2
Downloading Google APIs by Google Inc., Android API 3, revision 3
Installing Google APIs by Google Inc., Android API 3, revision 3
Installed Google APIs by Google Inc., Android API 3, revision 3
Updated ADB to support the USB devices declared in the SDK add-ons.
'adb kill-server' succeeded.
ADB: * daemon not running. starting it now on port 5037 *
'adb start-server' succeeded.
ADB: * daemon started successfully *
Project Buld Target の変更
Eclipse において Google API を参照するように変更する.具体的には,Project → Properties → Android → Google APIs(適当なバージョン)にチェックを入れる.(チェックボックスのすぐ下に "Android + Google APIs" と出ているから,たぶん大丈夫)
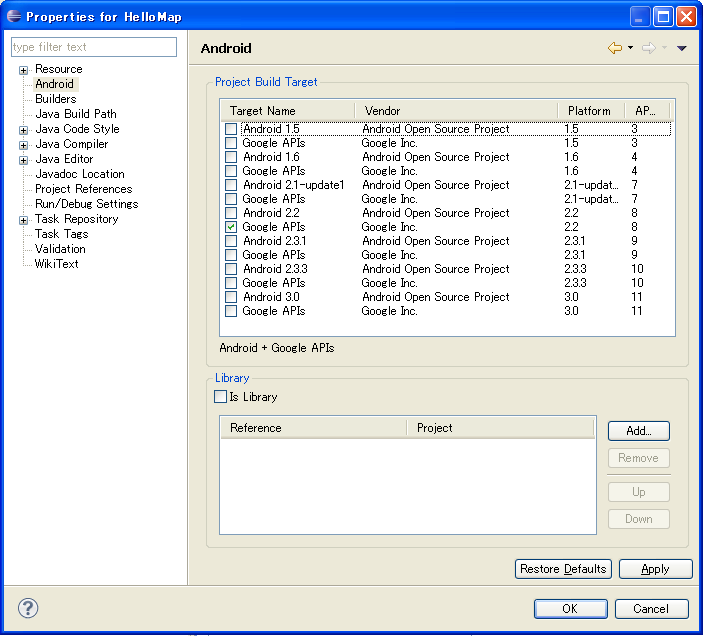
なお,プロジェクトの新規作成時に "Android + Google APIs" を指定してもよい.
AndroidManifest.xml の編集
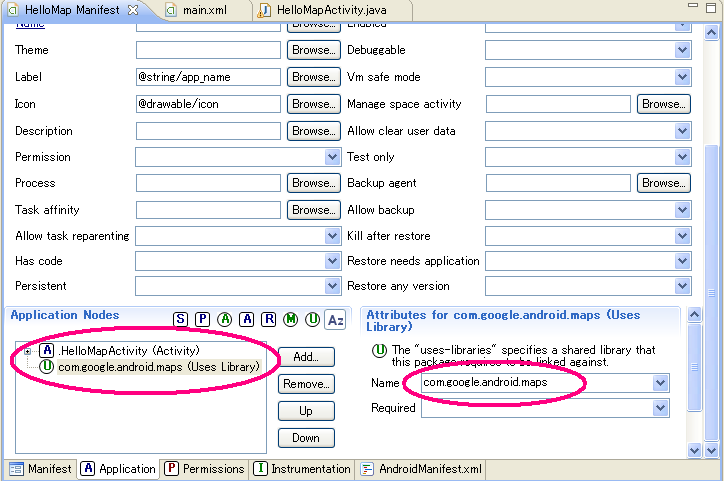
インターネットにアクセスするため,パーミッションの設定を "android.permission.INTERNET" とする.また,Google Maps のクラス MapView を利用するため,"com.google.android.maps" をライブラリとして追加する.
AndroidManifest.xml(パーミッション&ライブラリ設定前)
<?xml version="1.0" encoding="utf-8"?>
<manifest xmlns:android="http://schemas.android.com/apk/res/android"
      package="jp.hews.hellomap"
      android:versionCode="1"
      android:versionName="1.0">
    <uses-sdk android:minSdkVersion="8" />

    <application android:icon="@drawable/icon" android:label="@string/app_name">
        <activity android:name=".HelloMapActivity"
                  android:label="@string/app_name">
            <intent-filter>
                <action android:name="android.intent.action.MAIN" />
                <category android:name="android.intent.category.LAUNCHER" />
            </intent-filter>
        </activity>

    </application>
</manifest>
AndroidManifest.xml(パーミッション&ライブラリ設定後)
<?xml version="1.0" encoding="utf-8"?>
<manifest xmlns:android="http://schemas.android.com/apk/res/android"
      package="jp.hews.hellomap"
      android:versionCode="1"
      android:versionName="1.0">
    <uses-sdk android:minSdkVersion="8" />

    <application android:icon="@drawable/icon" android:label="@string/app_name">
        <activity android:name=".HelloMapActivity"
                  android:label="@string/app_name">
            <intent-filter>
                <action android:name="android.intent.action.MAIN" />
                <category android:name="android.intent.category.LAUNCHER" />
            </intent-filter>
        </activity>
		<uses-library android:name="com.google.android.maps"></uses-library>
    </application>
    <uses-permission android:name="android.permission.INTERNET"></uses-permission>
</manifest>
レイアウトの設定
レイアウトリソースの main.xml に
<?xml version="1.0" encoding="utf-8"?>
<LinearLayout xmlns:android="http://schemas.android.com/apk/res/android"
    android:orientation="vertical"
    android:layout_width="fill_parent"
    android:layout_height="fill_parent"
    >
	<com.google.android.maps.MapView
		android:id="@+id/mapview"
		android:layout_width="fill_parent"
        android:layout_height="fill_parent"
        android:enabled="true"
        android:clickable="true"
        android:apiKey="@string/api_key"
        />
</LinearLayout>
アクティビティ
package jp.android.hellomap;

import android.app.Activity;
import android.os.Bundle;
import com.google.android.maps.GeoPoint;
import com.google.android.maps.MapActivity;
import com.google.android.maps.MapController;
import com.google.android.maps.MapView;

public class HelloMapActivity extends MapActivity {
    //地図に関する初期値
    static final int INITIAL_ZOOM_LEVEL = 15;
    static final int INITIAL_LATITUDE = 35455281;
    static final int INITIAL_LONGTITUDE = 139629711;

    /** Called when the activity is first created. */
    @Override
    public void onCreate(Bundle savedInstanceState) {
        super.onCreate(savedInstanceState);
        setContentView(R.layout.main);

        //MapView からコントローラを取り出す
        MapView map_view = (MapView)findViewById(R.id.mapview);

        //地図のズームを制御するためのズームコントローラを配置
        map_view.setBuiltInZoomControls(true); //getZoomControls();

        //位置とズームレベルの初期状態を設定する
        MapController controller = map_view.getController();
        GeoPoint point = new GeoPoint(INITIAL_LATITUDE, INITIAL_LONGTITUDE);
        controller.setCenter(point);
        controller.setZoom(INITIAL_ZOOM_LEVEL);
    }

    @Override
    protected boolean isRouteDisplayed() {
        // TODO Auto-generated method stub
        return false;
    }
}

